


February 2012
Turntable Mod's
19/02/12 11:23 *HELIX USB CableTweaks | Turntable Mod's
Not so much a "tweak" - more a complete rebuild 
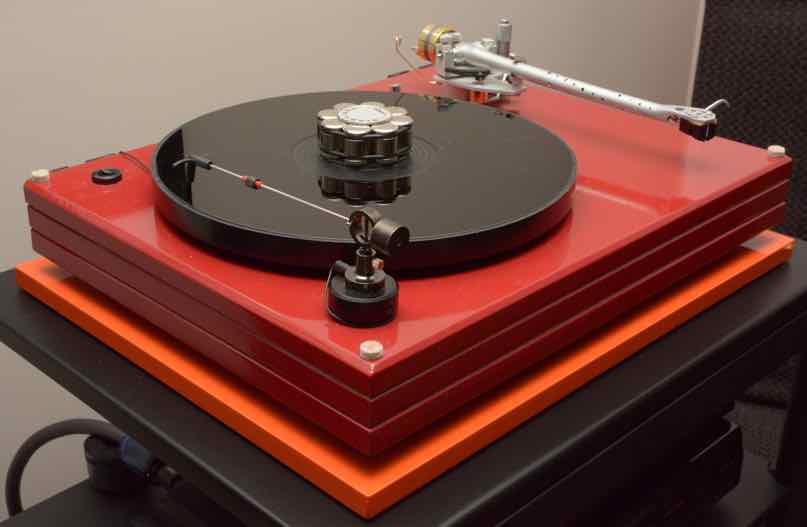
My turntable started life 30 years ago as a Rega Planar II
Rega's approach back then was to utilize a simple plinth design that was low in density with a bonded aluminum top that would shed vibrations before they reached the arm and platter. Alas, this design was prone to larger "floor vibrations" and required a substantial stand to effectively isolate it.
Rega's solution was to bolt a metal frame to the wall, which worked well with "brick walls", but with timber-frame construction it failed to provide a complete solution.
Since that design, Rega and other manufacturers have adopted the original simplistic Rega design format, but using materials like MDF to build plinths that are acoustically inert.
Taking a queue from these designs I decided to build a new plinth made of 3 sheets of bonded MDF giving it considerably more mass and superior isolation qualities. The design point of increasing the mass is that any vibrations in the component shelf will not be able to move a high mass plinth, especially when combined with an isolation foot with extremely good absorption properties like Sorbothane, as detailed in the section Component Isolation Foot in this blog
The plinth is supported by three of these feet with a modification to imbed them into the underside of the plinth. The feet have been located such that the points at which the arm and platter bearing are attached to the plinth sits in the "null point" of any residual vibrations.
The Arm
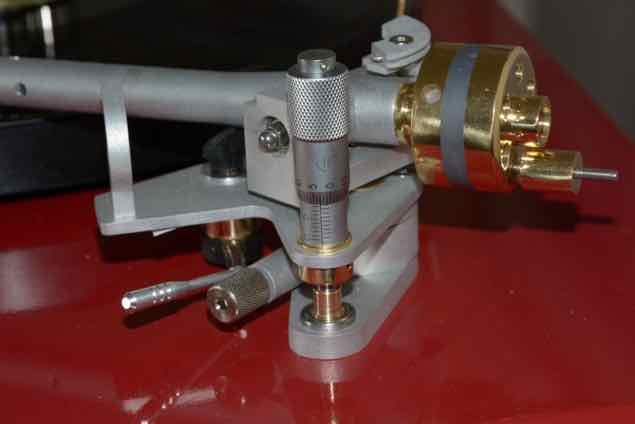
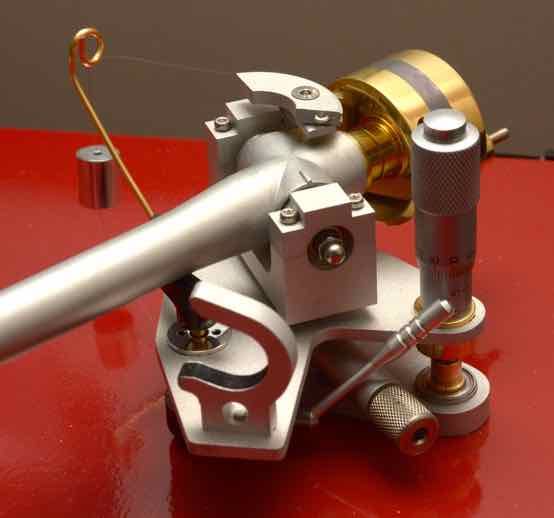
The original "S shaped" arm was originally replaced by a Rega RB250 tonearm with the addition of a Cardas Incognito one piece loom, but the latest addition is an Audiomods Series 3 tonearm pictured here (also see Audiomods "Classic" Tonearm Review). This arm uses the RB250 arm tube and that’s where all similarity to the Rega arm ends!
This shows the micrometer VTA adjustment which allows for repeatable adjustments and more importantly, resetting back to the original state.
The counterweight is “drilled out: to lower it’s centre of gravity and has an additional fine tuning adjustment weight for very accurate setup.
Place an album on the turntable (do not start the motor)
Lower the cartridge onto the album
Set the pin touching the front of the front of the cartridge.
Fine adjustment can be accomplished by turning the screw running through the grey foam
Move the device to the rear of the cartridge and adjust the VTA so the pin touches the top of the cartridge at the rear
You may need to re-check the front again after the adjustment and repeat the process
Voila - the cartridge is pretty darn close to parallel - better than eyeballing
You can then adjust VTA so the cartridge is in either a tail-up or tail-down position - as desired
The Sub-Platter
The original Sub-platter has been replaced by the ISOsub GT 2 S UPGRADE SUB PLATTER and ceramic bearing from Isokinetic. Note: the three brass spacers in the photo are required to elevate the platter above the central spigot so the platter can be used without a turntable mat.
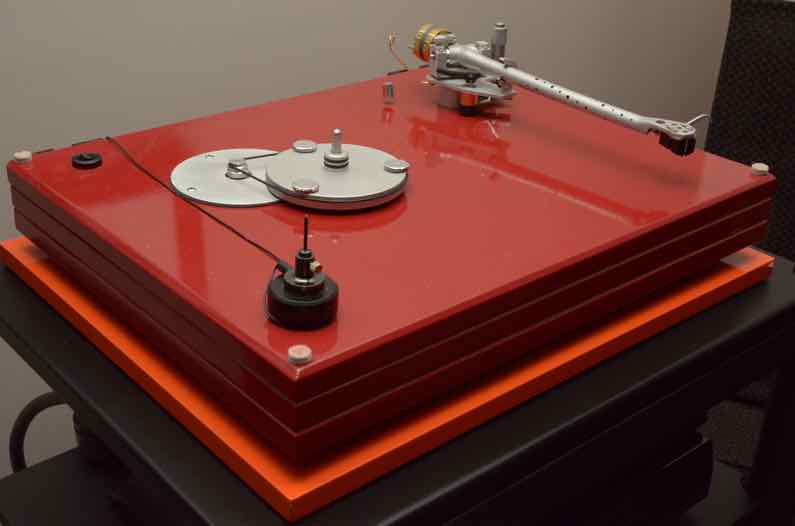
The original glass platter has been replaced with an SRM/TECH Deluxe Acrylic Platter for the Rega
To round out the tweaks the motor has been replaced with the Rega II Motor Upgrade kit
Installed on the arm is an all time classic - the Denon DL-103 Phono MC Cartridge (with brass mounting plate)
The only original parts left from the Rega Planar II is the switch and the cover!
These "tweaks" have elevated this turntable to a performance level that rivals many higher-end models.
I could have purchased a new turntable for the price I have paid out on these upgrades - but the outcome of this exercise has been very enlightening and increased my knowledge pertaining to the important elements of good turntable design and I feel the turntable performance exceeds any turntable of that price by a considerable margin.
So, what improvements did each tweak make?
My turntable started life 30 years ago as a Rega Planar II
Rega's approach back then was to utilize a simple plinth design that was low in density with a bonded aluminum top that would shed vibrations before they reached the arm and platter. Alas, this design was prone to larger "floor vibrations" and required a substantial stand to effectively isolate it.
Rega's solution was to bolt a metal frame to the wall, which worked well with "brick walls", but with timber-frame construction it failed to provide a complete solution.
Since that design, Rega and other manufacturers have adopted the original simplistic Rega design format, but using materials like MDF to build plinths that are acoustically inert.
Taking a queue from these designs I decided to build a new plinth made of 3 sheets of bonded MDF giving it considerably more mass and superior isolation qualities. The design point of increasing the mass is that any vibrations in the component shelf will not be able to move a high mass plinth, especially when combined with an isolation foot with extremely good absorption properties like Sorbothane, as detailed in the section Component Isolation Foot in this blog
The plinth is supported by three of these feet with a modification to imbed them into the underside of the plinth. The feet have been located such that the points at which the arm and platter bearing are attached to the plinth sits in the "null point" of any residual vibrations.
The Arm
The original "S shaped" arm was originally replaced by a Rega RB250 tonearm with the addition of a Cardas Incognito one piece loom, but the latest addition is an Audiomods Series 3 tonearm pictured here (also see Audiomods "Classic" Tonearm Review). This arm uses the RB250 arm tube and that’s where all similarity to the Rega arm ends!
This shows the micrometer VTA adjustment which allows for repeatable adjustments and more importantly, resetting back to the original state.
The counterweight is “drilled out: to lower it’s centre of gravity and has an additional fine tuning adjustment weight for very accurate setup.
Setting VTA
VTA is “generally” correct if the top of the cartridge is parallel to the playing surface
If your arm has VTA adjustment the process is relative easy, otherwise shims need to be applied
Getting the top of the head-shell parallel requires a device something like this one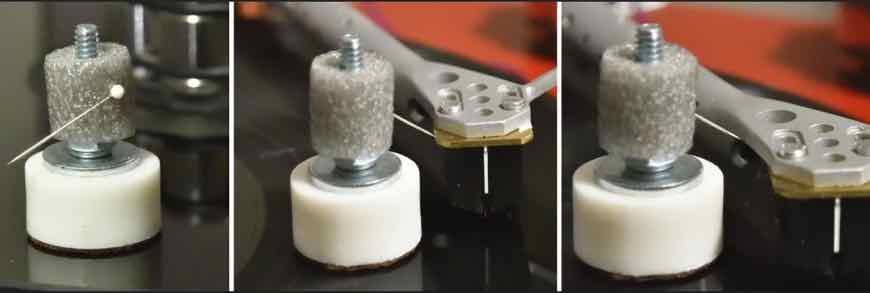
You can make one very cheaply
- a couple of washers,
- a screw and a couple of nuts,
- a felt pad for the bottom
- a piece of foam
- and a dressmaking pin
Place an album on the turntable (do not start the motor)
Lower the cartridge onto the album
Set the pin touching the front of the front of the cartridge.
Fine adjustment can be accomplished by turning the screw running through the grey foam
Move the device to the rear of the cartridge and adjust the VTA so the pin touches the top of the cartridge at the rear
You may need to re-check the front again after the adjustment and repeat the process
Voila - the cartridge is pretty darn close to parallel - better than eyeballing
You can then adjust VTA so the cartridge is in either a tail-up or tail-down position - as desired
The Sub-Platter
The original Sub-platter has been replaced by the ISOsub GT 2 S UPGRADE SUB PLATTER and ceramic bearing from Isokinetic. Note: the three brass spacers in the photo are required to elevate the platter above the central spigot so the platter can be used without a turntable mat.
The original glass platter has been replaced with an SRM/TECH Deluxe Acrylic Platter for the Rega
- see my SRM/TECH Acrylic Platter Review for more details
To round out the tweaks the motor has been replaced with the Rega II Motor Upgrade kit
Installed on the arm is an all time classic - the Denon DL-103 Phono MC Cartridge (with brass mounting plate)
The only original parts left from the Rega Planar II is the switch and the cover!
These "tweaks" have elevated this turntable to a performance level that rivals many higher-end models.
I could have purchased a new turntable for the price I have paid out on these upgrades
So, what improvements did each tweak make?
- Plinth re-build - provided a much improved soundstage, lower background noise and better details in instruments, together with the near elimination of vibrations to the arm and platter
- Audiomods Series 3 tonearm - huge improvements in fine details of recording venue such as concert hall reverberations and soundstage
- ISOKINETIK Sub Platter - significant improvements in the hi-frequency details and silent bearing operation
- SRM/TECH Deluxe Acrylic Platter - in combination with the Sub-platter the Acrylic Platter has made huge improvements to the details and 3D image to a level I had only heard on turntables costing substantially more.
- Rega II Motor Upgrade kit - near elimination of wow and flutter and much quieter operation
Isolation - Mecahnical and Electrostatic
Mechanical Isolation - Rack Vibrations
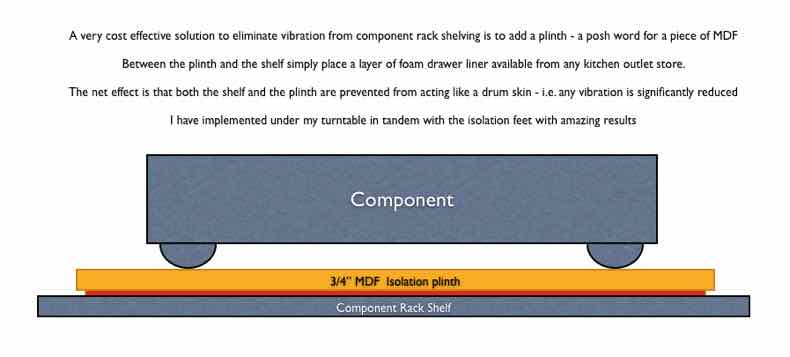
UPDATE: in place of the 3/4” MDF isolation plinth I now use an 3/8” granite tile.
It provides superior isolation when used with the * Cone Isolation Feet - What They Do (1)
PHOTO OF NON_SLIP DRAWER LINER USED

Electrostatic Isolation
This section describes some vert effective and very affordable cable riser solutions
Why do you need them?
- there is an electrostatic “connection” between carpet and cables that rest on them
- On high resolving systems you may notice an improvement by lifting the cables of the floor
Cable risers can cost an alarming amount of money, when they can cost only a few bucks and a little effort...
A trip to the Dollar Store was a real eye opener
- I purchased the alphabet blocks for around $6 and the craft sticks for $2
- the printing block were a little more expensive - $12 - but they have that little indent in the sides which was perfect for my speaker cables
- 2 sheets of 2” square ceramic tiles from Home Depot cost around $18
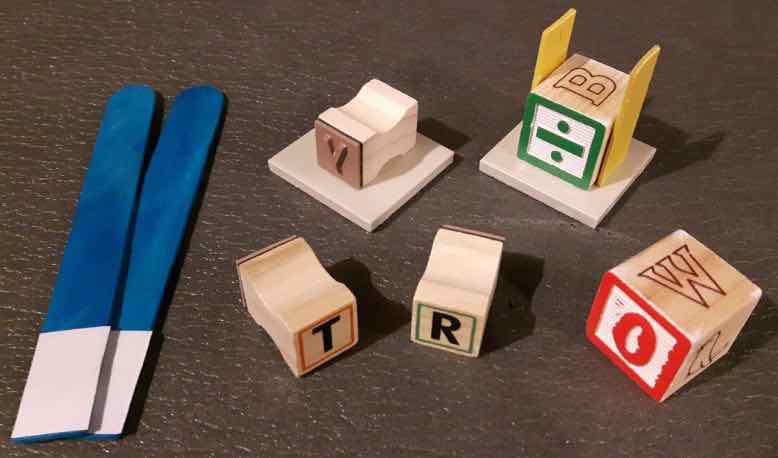
The craft sticks had double sided tape, so I just cut to length and stuck them to the alphabet blocks
- some two sided tapes attached them to the ceramic tile
The printing blocks just need some two sided tape to attach them to the ceramic tile.
So for $38 I have enough risers for power and speaker cables...
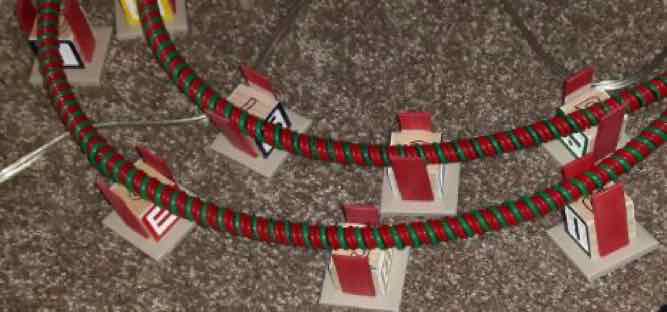
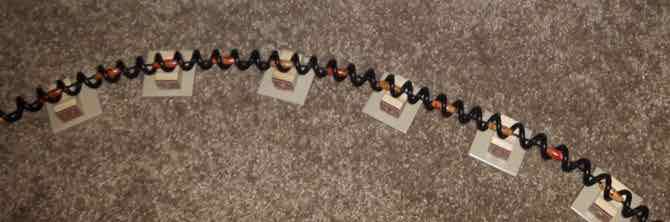
Should the be higher off the ground?
Well I did try suspending the cables about 15” above the ground also and I could not tell any difference.
They are definitely a talking point when friends come over
Power Supply Basics
02/02/12 16:39 *HELIX USB Cable*You Need a Good PS
WARNING: unless you are an experienced electrical professional - consult a technician
OK - so this is one of those areas where the whole "audiophile" world can go completely berserk with cables, outlets and plugs made from high priced materials and components to "purify the supply"
If you have the money to spend and the belief they work - by all means buy them. You've obviously done your homework! So skip this section.
But - this guy loves his wife and he wants to stay married to her - high honey
On the other hand, if you are not knowledgeable in this area and want to get a basic understanding of what can be accomplished - read on...
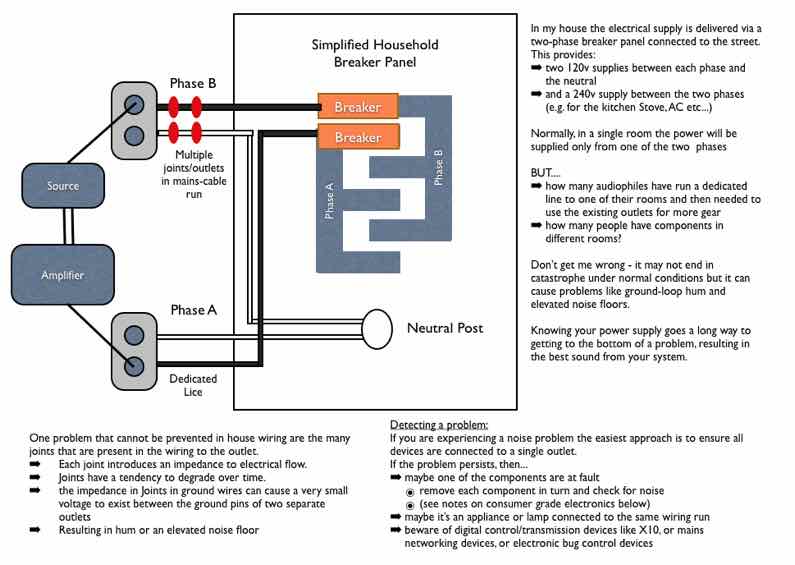
So, what are the power related items that you can augment or add to improve the quality of the power to a component?
BUT FIRST - Let's talk about the UPS before we go any further:
So - let's take a look at the more basic things you can do...
Why hospital grade? - they are manufactured to higher standards with better materials - but more importantly, they clamp on the pins of the plug so much better.
Why not install a "filtered outlet" instead? - this is yet another place where opinions differ...
Now, if you are not replacing your power cord - WHY NOT?
Why?
So now you've got the outlets and power cables sorted - what's next?
Combined with my DIY Power Cables - The "POWER HELIX" I find no need for a power conditioner
What is a "Balanced Power Supply"?
So what exactly is an "Isolation Transformer" then?
But wait - what about "Power Re-generators"?
A DIY Power Distribution Box/Panel
As a minimum, you should install a quality power distribution box to plug components into.
This diagram details the the wiring method to follow

These are fairly simple to build with the right parts....
You will also need the following....
Spring Clips like this for connecting to the mini breaker...
![image[17]](image005b17005d.jpg)
IEC Chassis Connector like this...
![image[14]](image005b14005d.jpg)
Mini Circuit Breaker of the correct current rating like this...
![image[11]](image005b11005d.jpg)
All the wiring on the Neutral side is ROMEX house wire - but higher quality wire can be used such as 12 gauge mil spec wire from Take Five Audio
The wiring on the live side can be ROMEX, but higher quality wire, such as Furutech will perform better. If you use stranded wire I would recommend using spade connectors to fasten them
Wiring each outlet back to the power bus improves the isolation between outlets and reduces the capability for injecting noise from one component to another component
To sum up! - the things that I consider will get the most bang for the buck are...
The rest of the items talked about here will certainly improve the quality or the power in your supply, but they tend to get very expensive and are more of a "last resort fix" to resolve the more difficult power supply issues you might encounter!
OK - so this is one of those areas where the whole "audiophile" world can go completely berserk with cables, outlets and plugs made from high priced materials and components to "purify the supply"
If you have the money to spend and the belief they work - by all means buy them. You've obviously done your homework! So skip this section.
But - this guy loves his wife and he wants to stay married to her - high honey
On the other hand, if you are not knowledgeable in this area and want to get a basic understanding of what can be accomplished - read on...
So, what are the power related items that you can augment or add to improve the quality of the power to a component?
- The power line from the junction box
- the wall outlet
- Filtered outlets
- Power cable plugs and connectors
- Power cable lead (i.e. the wire)
- Power Conditioner
- Power regenerator
- Balanced power supply
- Isolation Transformers
BUT FIRST - Let's talk about the UPS before we go any further:
- Many are primarily designed to protect computer electronics and allow you enough time to shut down your computer.
- There are a few designed for "Consumer H-Fi", but most are designed for computer use
- Their outlets may not provide the best clamping of plugs
- Getting one with a sufficient rating to power your setup for a couple of minutes can be expensive
- I have read of success stories, but my attempts with my AV system have only resulted in failure.
- I definately WOULD NOT consider these for audiophile use at present.
So - let's take a look at the more basic things you can do...
- if possible run a separate power line from the junction box to the hi-fi
- while you're doing that make it a 20 amp cable - your hi-fi will love you for it!
- install a 20 amp Pass and Seymour MRI grade outlet - do not do this on a 15 amp line - IT'S AGAINST CODE!
- if you can't run a new cable, then replace the 15 amp outlet with a 15 amp hospital grade outlet
- if you really want to up the anti - install one of the basic Furutech Outlets or a similar product/brand - there's lots to choose from
Why hospital grade? - they are manufactured to higher standards with better materials - but more importantly, they clamp on the pins of the plug so much better.
Why not install a "filtered outlet" instead? - this is yet another place where opinions differ...
- I prefer NOT to have a filter/conditioner on my Amp
- I've have read they can compress the sound
- Companies like Nordost promote the use of unfiltered power sources!
- Other companies make their bread and butter from them - so they think they are essential!
- using an unfiltered outlet gives you more options - like - adding an external unit later should YOU choose to
- tell ya what - try one and see what happens
Now, if you are not replacing your power cord - WHY NOT?
- didn't you read the section You Need Good Power Cords?
- the least you can do is replace the plugs/connectors?
Why?
- Because that crappy little cable that was meant for a computer has an even worse plug on it!
- when you cut into the cable - you'll see how bad the cable really is
- you'll do yourself a favour and replace the power cord while you're at it! - mission accomplished!
Seriously
If you do not plan on replacing the 18 gauge power cords that came with your components
STOP RIGHT HERE!
You'll just be wasting your money!
But if you are serious about fine tuning the power components of your system a good power cable is essential...
- there are lots of nice, reasonably priced plugs out there to choose from...
- like the Vanguard Gold Plated Copper Connectors
- There are also reasonably priced plugs with un-plated copper pins - is copper good?
- YES - VERY GOOD, IF YOU KEEP THE PINS CLEAN - annual cleaning required, especially if the outlet is on an outside wall!
- Then there's the various cables like that sold by Furutech and DH Labs...
- only those that use high quality copper, silver coated copper and solid silver as conductors should be used
- Screened cable, braided and helix designs that assist in dealing with eliminating RF are preferred
- For added safety/security I crimp spade connectors to the conductors
- this ensures maximum electrical contact and the wire should remain securely attached
- If you prefer to go the ready made route, be aware that some "boutique cables" do not actually perform that well
- The market for these is huge and like anything else - some companies charge over the top for their product
- Which one to buy? -
- Look for the companies that specialize in unconventional cable architectures like Anticables
- Price too good to be true? - be very aware of Brand Fakes!
- I also think that like any other component in the system you need to match the cable to its component e.g.
- I would start with 10-12 gauge for amps and 14-15 gauge for ALL other components
So now you've got the outlets and power cables sorted - what's next?
- Generally, some sort of power distribution centre, like a Power Bar or Power Conditioner
- The main problem here is the market is flooded with poorly made power bars and conditioners
- unless you get one from a reputable company like Furutech, PS Audio, etc. - they are not desirable due to poor construction and materials
- If you are going to spend that much, you might also look at a power conditioner
Combined with my DIY Power Cables - The "POWER HELIX" I find no need for a power conditioner
What is a "Balanced Power Supply"?
- Basically, it is a large transformer that is "generally" wired into the mains supply beside the junction box
- It provides clean and phase coherent balanced AC power that remains stable regardless of how they are loaded down
- Good ones are built like tanks and are designed to handle the dynamic demands of music, like those available from Equi=tech
- There are also "portable products: that plug into the wall outlet.
- A more flexible approach! - until you see the quality of the attached power cord
- As a general rule of thumb - never connect your component to the main supply via any device with a whimpy power cord!!!
So what exactly is an "Isolation Transformer" then?
- It's similar in principle to a Balanced Power Supply in many respects, a little smaller scale, generally portable and most products also offer surge protection and overload protection
- • Again, units like the Tripplite Medical-Grade Isolation Transformers are built to higher specifications and can also be used in audio setups
- Units with a sufficiently high power rating can be used on the lower powered Integrated/Power amps
- However, it is very important that you know the VA rating, since units often have a "trip device" to protect against overloads
- I would recommend ONLY using these on source components or lower powered tube amps due to their reduced power handling abilities
- NOTE: - from what I have observed, these units can be used in place of a power conditioner and do not appear to compress the sound.
But wait - what about "Power Re-generators"?
- first let me say - there is no better power supply than that which comes out of the outlet - i.e. when it works right!
- however, if you live in an area that suffers constant power fluctuations/brownouts then you might want to consider one - wait, make that two!
- As discussed in the section You Need Good Power Cords the peak current demands can get quite high
- because of that I would recommend one unit for the source and one for the Amp(s).
- of course that also depends on how much power your system needs - One unit would be ample for my entire system.
- Expensive - yes, but how much is your system worth - bad power can destroy your investment - seriously!
- These units do not have the same "headroom" as the power company, but if the power supply is really bad then it becomes a viable solution
- I do think they should be considered "A LAST RESORT" to fix a troublesome mains supply, rather than considering them as standard equipment
- But - if you are in a real bind with your power supply and can afford the best the industry has to offer - go for it
A DIY Power Distribution Box/Panel
As a minimum, you should install a quality power distribution box to plug components into.
This diagram details the the wiring method to follow
These are fairly simple to build with the right parts....
- Outlets : MRI Grade Pass and Seymour from Take Five Audio
- Distribution Box : can be purchased from VT4C Studio
You will also need the following....
Spring Clips like this for connecting to the mini breaker...
IEC Chassis Connector like this...
Mini Circuit Breaker of the correct current rating like this...
All the wiring on the Neutral side is ROMEX house wire - but higher quality wire can be used such as 12 gauge mil spec wire from Take Five Audio
The wiring on the live side can be ROMEX, but higher quality wire, such as Furutech will perform better. If you use stranded wire I would recommend using spade connectors to fasten them
Wiring each outlet back to the power bus improves the isolation between outlets and reduces the capability for injecting noise from one component to another component
To sum up! - the things that I consider will get the most bang for the buck are...
- A dedicated Power line from the junction box - 20 amp if possible
- this will result in less noise, since the line is not shared with household appliances e.g. with the washing machine
- A hospital grade outlet - i.e. at minimum
- better plug-pin clamping will result in better transmission of power to the component
- A good power cable - including good plugs/connectors
- please read the section "You Need Good Power Cords" for benefits
- A power distribution Box
- at a minimum to plug the source components into
- The DIY box above is great value
- An isolation transformer
- ONLY if the power supply to the house old and is very noisy
- removes any noise that may be present at the outlet
The rest of the items talked about here will certainly improve the quality or the power in your supply, but they tend to get very expensive and are more of a "last resort fix" to resolve the more difficult power supply issues you might encounter!