


DIY Speaker Cables - The HELIX Speaker
They’re finally here !!!
Regular visitors to this web site are probably familiar with the Helix Mark V IC and the POWER Helix power cables and now I’ve finally had a chance to develop the Helix Speaker cable.
I’d been procrastinating about making a Helix geometry speaker cable for some time, mainly because I needed a 10 foot pair of cables.
- Winding a helix neutral of the correct gauge for a 10 foot cable was, for me, a little daunting, until I found a twisted pair conductor that was perfect for the job.

So what makes Helix cables work?
My hypothesis ...
To understand why the Helix geometry of these cables work so well - you have to look at what goes on inside the cable and the attached components.
First - you have to forget the notion that the two conductors inside a cable are performing a similar role.
They Are Not!
- The signal conductor - as it’s name implies - carries the audio signal.
- But the neutral conductor connects the neutral side of the circuits of the components that cable is connected to.
This is extremely important for the circuit to function correctly!
Now - audiophiles know that if you lay cables next to each other in parallel, they are prone to pickup noise by a process known as induction. So it stands to reason that inside an audio cable, where the signal and neutral are as close together as you can get them, that the signal conductor is probably inducing noise into the neutral conductor.
Ah! (you say), but the neutral is connected to the ground!
Yes it is, however, electricity is a bit like water. if you spill water onto a surface it flows in all directions - not in one direction only.
So the noise permeates through the entire neutral side of the connected components causing those circuits to distort ever so slightly, and then those distortions get amplified until they become very noticeable.
So, how do these cables prevent that from happening?
ONE: the signal conductor is of a smaller gauge than the neutral conductor - this reduces the effectiveness of the induction process.
TWO: The neutral is constructed from a twisted pair of conductors - this also acts to reduce the effectiveness of the induction process even further.
THREE: The neutral conductor is wound around the signal conductor, so it is NEVER parallel to it.
VOILA! - all noise is eliminated !!!
(pretty much)
For more theory pertaining to this see Electromagnetic Interference - Considerations in Structured Cabling Systems from Siemens
So there you have it - the Helix Geometry is perhaps the most noise free design you can get.
It should be applied to ALL cables in a system, resulting in a level of fidelity you probably thought could only be attained by having components costing considerably more.
What will you hear? - for me the most noticeable improvement were the venue acoustics, i.e. the echoes and reverberations that surround each artist and instrument.
At first, it can sound as though you have an echo problem in the room, but I have several tracks where there are no reverberations, so playing those confirmed my room acoustics were perfectly fine.
Other attributes that are clearly audible include clarity, neutrality, dynamic performance, bass depth and control.
But one effect that took a while for me to realize just how much it effects the sound is phasing. Phasing controls the placement of instruments and artists in two ways.
- Their location within the depth of the image
- Their location outside the width of the speakers
We all know if you connect the speakers out of phase the image becomes muddled and the bass performance drops off.
But varying the phase by small amounts can move the position of instruments and artists within the image. The noise impacts the phase of the signals of both channels differently, resulting in an inaccurate image.
Since the Helix Geometry eliminates most all of the noise created inside the actual cable - you will notice an incredibly precise placement of instrument and artist within the image AND an incredibly large image that melts the boundaries of the listening room.
PLEASE NOTE: Your system will probably not achieve its full potential by installing just one set of helix cables...
They ALL have to have the helix geometry !!!
So How Do I Make Them?
Here are the parts...
- Neutral conductor: (a 13 gauge twisted pair copper conductor)
- https://www.takefiveaudio.com/products/1683-belden-9497-cryo-treated/
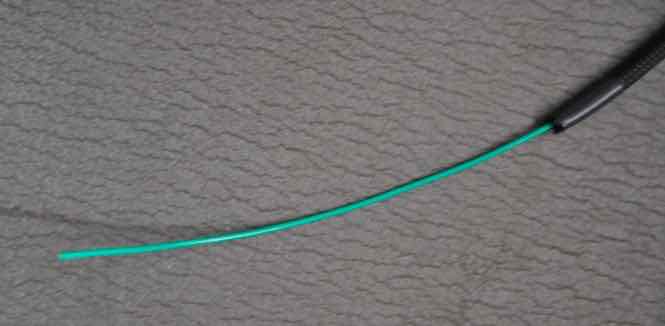
- Signal conductor: (a 16 gauge silver plated conductor)
- https://www.takefiveaudio.com/products/334-mil-spec-16-awg-silver-plated-copper-wire-green-cryo-treated/
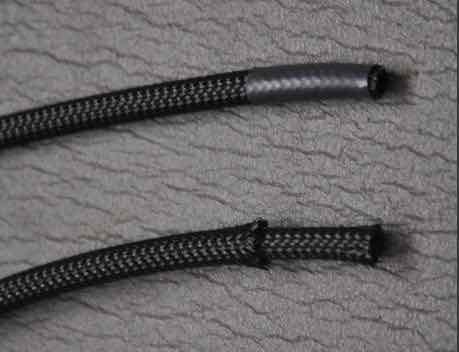
- Signal sleeve :
- https://www.takefiveaudio.com/products/1193-tight-weave-polyethylene-expandable-cable-sleeve-14/
- 3/8” Black heat-shrink :
- https://www.takefiveaudio.com/products/566-cpx-100-38-crosslinked-polyolefin-shrinktube/
- 3/16” Red heat-shrink :
- https://www.takefiveaudio.com/products/1637-cpx-100-316-crosslinked-polyolefin-shrinktube/
- One five foot fibreglass rod from home depot
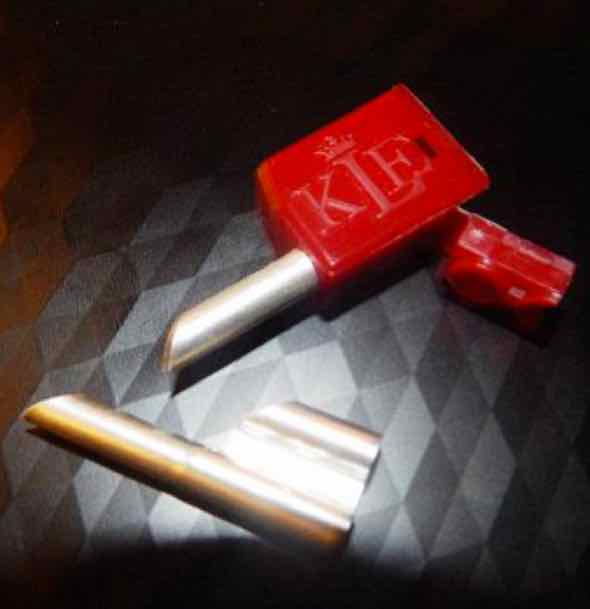
- One set of KLEI™Classic Harmony Banana plugs
The neutral conductor should be twice as long as the signal conductor, although you can experiment with this ratio
The signal sleeve is 12-15” shorter than the signal conductor in order to leave some straight wire for the connectors, but you will require two lengths of sleeve for each cable.
- Allow extra for the outer layer because when it expands it actually shortens
- I allowed 6” for the outer sleeve
So for one 10 ft cable PAIR you need
- 20 ft of signal conductor i/e/ 10 x 2
- 37 ft of expandable sleeve,
- 40 ft of neutral conductor.
You will also need around 2 feet of the 3/8 heat-shrink and 3 feet of the 3/16” heat-shrink
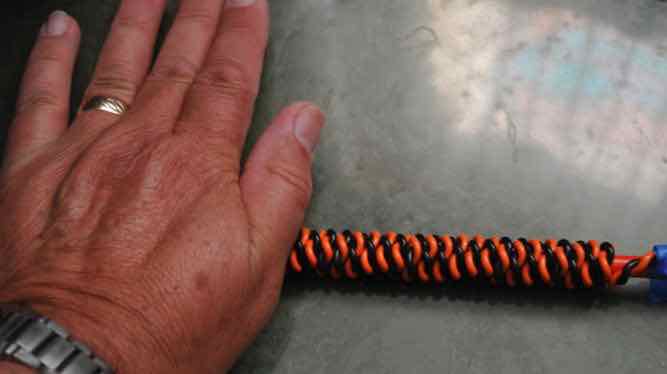
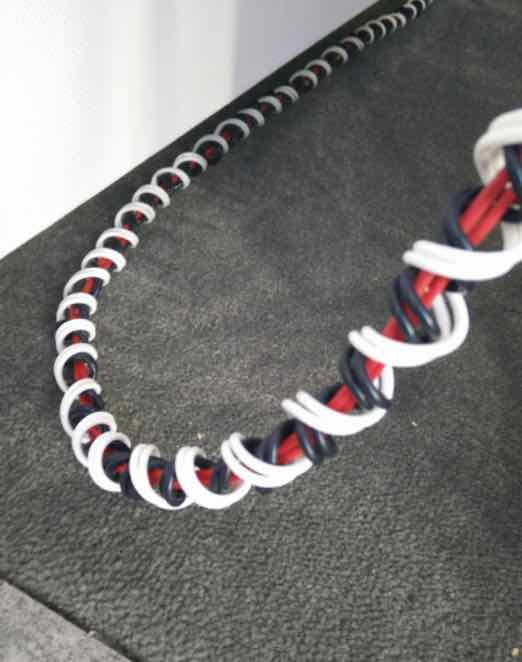
Construction...
Cut the signal sleeve to length and insert one piece into a second piece (see below)
Once inserted place a piece of heat shrink at then end to prevent fraying
Insert the signal conductor into the sleeve and allow around 6”-8” extra - cut to length
Then remove the conductor - it will be inserted later
Next, cut two equal lengths of the neutral conductor - this should be twice the length of the signal conductor
Put a very tight 90 degree bend in the conductor and tape to the fibreglass rod
Place the end of the fibreglass rod into the chuck of a variable speed drill
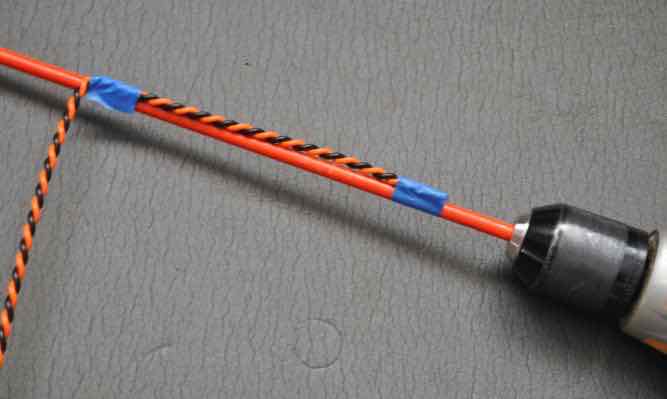
Slowly wind the conductor onto the rod
Once the other end of the conductor is reached (leave 6”-8” of straight conductor) tape the conductor to the rod and remove it from the drill
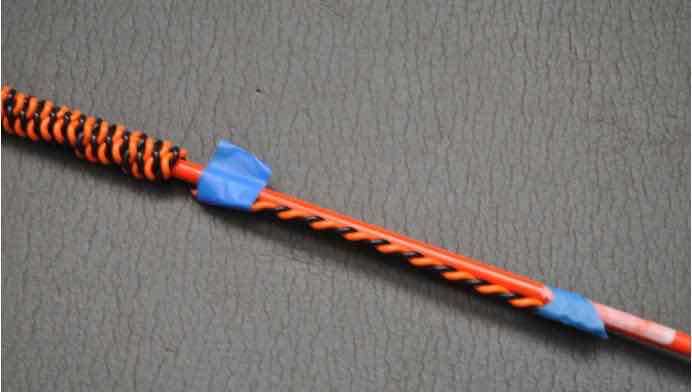
Heat the conductor with a hair dryer to make it more malleable
With the palm of your hand, roll the cable assembly on a hard surface to tighten the coil
Leaving the conductor on the rod for a couple of hours will prevent some unraveling.
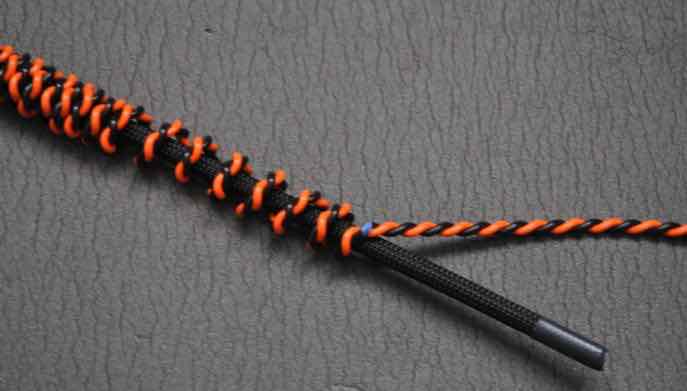
Remove the coil from the rod and insert the signal conductor sleeve
Hot glue the neutral conductor to one end of the signal sleeve
Place a small piece of heat shrink over the glue - this helps maintain the joint
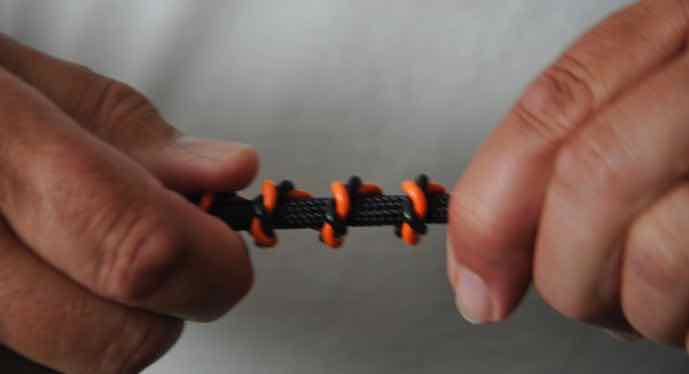
Starting at the end that has been glued, space the windings and tighten them as you proceed down the length of the cable.
Space the windings evenly (within reason) until the coil end of the neutral reaches the end of the signal sleeve
NOTE: Wearing a pair of gloves will prevent blisters
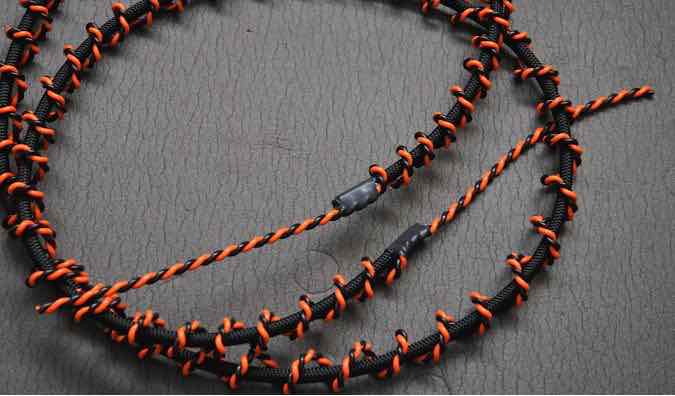
Once the neutral is aligned over the signal sleeve, glue the end to the sleeve and apply the heat shrink as before. This completes this sub assembly
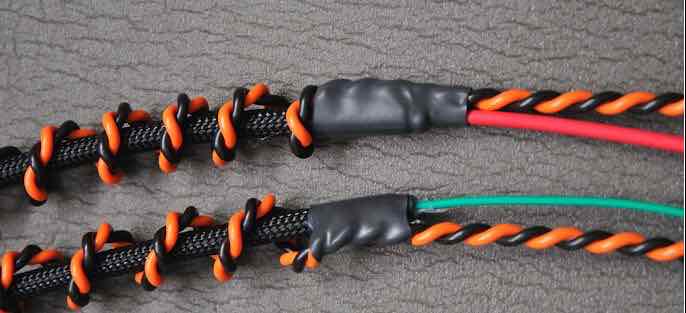
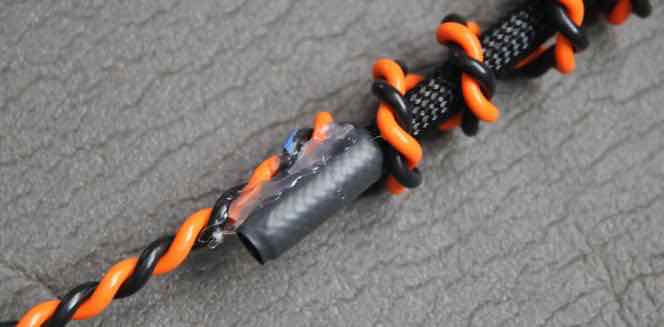
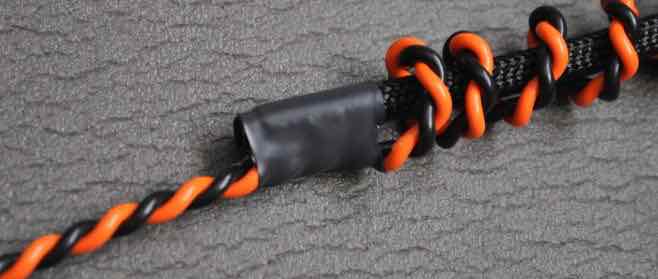
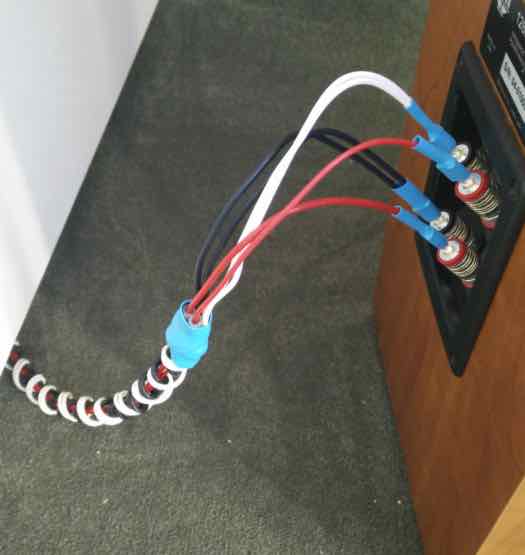
Insert the signal conductor into the sleeve and hot clue into place
Place a piece of the red 3/16” heat shrink over the signal conductor
If you do not like the orange/black look you can use some 3/4/ expandable sleeve to cover them.
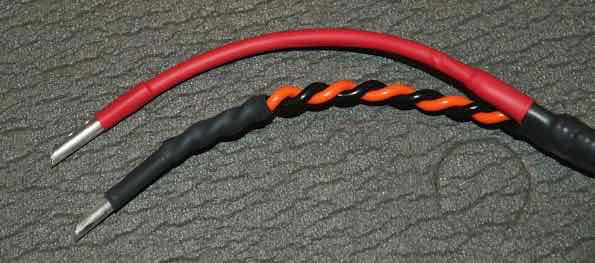
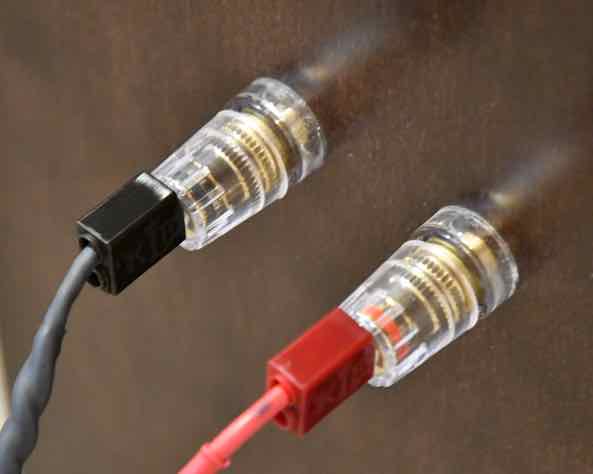
Attach the connectors of your choice - Voila!
UPDATE: I now highly recommend the KLEI™Classic Harmony Banana Connector/Adaptors because as you will read, they are exceptionally good and elevates the performance of these cables to a whole new level
These cables provide an extremely high resolution listening experience on all systems - i.e. once burned in
They have extremely low levels of capacitance and inductance, so they are perfect for most systems, especially high current solid state designs.
Please allow 100 hours burn in before making any judgement as to their abilities.
Please note: you are free to try whatever conductors you think might work - but the conductors identified above provide exceptional performance and value.
If you are thinking that 16 gauge is too thin to produce an excellent bass performance, I would suggest you try them first.
You will find their characteristics change during burn-in
- they will sound very good at first
- after around 12 hours their performance will degrade - bass will fall off and some distortion will occur
- after 30 hours they really start to shine
- by 100 hours they are exceptional and will continue to get better
They provide exceptionally detailed and a well controlled deep bass performance
The clarity of these cables is superb, as is the dynamics and imaging
Total cost for a 10 ft pair is around $120 US.
I have compared them to cables costing upwards of a couple of thousand dollars and they are superior across the board.
Hard to believe? Well, if I hadn’t heard it for myself I wouldn’t believe it either!
When I built these cables I was actually not expecting much in the way of improvement over my existing cables, which are excellent performers
I thought they might come close to their level of performance - BUT...
I was Blown Away!!!
AND REMEMBER: Your system will probably not achieve its full potential by installing just one set of helix cables...
They ALL have to have the helix geometry !!!
These cables are truly exceptional, from a fidelity perspective and from a cost perspective they are excellent VALUE!.
I give them my “Best Bang For The Buck” award.
My Review System:
Custom built turntable with a Soundsmith Denon DL103 phono cartridge mounted on an Audiomods Arm with one piece silver litz harness + KLEI Absolute®Harmony RCA’s
Simaudio MOON LP5.3 RS phono stage
Bluesound Node 2 music server
NAIM 5i integrated amp (with passive pre-section).
Gershman Acoustics Sonogram speakers.
 Give them a try - and - Enjoy The Music!
 ![]()
ADDENDUM:
The development of these cables was something of a collaborative effort. it all started when I responded to a post on the Audiogon Cable Forum by Audiogon member Toddverrone (Todd)
Todd was already familiar with the Helix design since had had already made a couple of my Helix power cables.
We discussed possible approaches, but since I had not actually made a set of Speaker Cables I figured I’d better “Walk the Walk”
And so, the Helix Speaker cables (of the above design) were “born”.
However, since Todd’s speakers were configured for a bi-wire/bi-amp approach he wondered if there was a viable Helix Bi-wire solution in a single cable.
Taking the design above, I modified it in the following manner to incorporate two sets of conductors (LF and HF) into a single cable as follows:
- the two positive conductors would be wound around the fibreglass rod and then straightened out by hand, but leaving the kinks in the conductors in place.
- Each conductor is wound in opposite directions in order to stop them from being able to touch continuously to prevent EMI contamination.
- the two signal conductors would be placed inside two (LF and HF) helix neutral windings, but each neutral would also be wound in opposite directions - again to minimize EMI contamination.
- The net result is what Todd referred to as - one “bad-ass” design
- Perhaps I should name it the - Bad-Ass Helix Bi-Wire ?
As part of the process, Todd had first built a prototype along the lines of the original design above, in order to gauge what the single wired cable would sound like.
This level if fidelity could then be used as a benchmark for comparison to the Bi-wired version.
Todd also used a high grade silver plated copper conductor for the bi-wire version
Final conductor details:
Signal Conductor
- One LF 12 awg conductor and One HF 14 awg conductor with a “kinky helix” wind in opposite directions,
- both are silver plated copper in ptfe from take five audio.
- Dual LF 12 awg silver plated copper conductors in ptfe for the inner helix
- Dual HF 14 awg silver plated copper conductors in ptfe for the outer helix
- The 14 gauge was the outer Helix because it is easier to wind
See pictures below...
And The Verdict?
Todd’s Feedback...
- So far, they are superb!
- The same black background as the single helix with cat 5, but more clarity from top to bottom.
- There's not more bass, it's just a bit tighter and cleaner.
- The mids and highs have greater clarity and come further out from the background, with better separation of sounds.
So there you have it! - Seems like Todd is pretty happy with his creation.
Whether single wire or bi-wire these cables provide extremely good fidelity, dynamics and bass performance. But please remember to allow them to burn-in for around 200 hours before serious listening.
A special thanks to Todd for taking on this difficult task - winding those helix neutrals can be quite tiring on the hands
I give them my “DOUBLE Best Bang For The Buck” award.
 Give them a try - and - Enjoy The Music!