


DIY Speaker Cables - The "HELIX IMAGE" Speaker Cable
So what makes Helix cables work?
It get’s pretty complicated ...
For more information on cable design issues please read the three articles below that talk about the many problems that challenge cables builders.
They will provide a great deal of insight into the many parameters and design techniques employed to build cables that excellent in their performance.
https://www.psaudio.com/article/cables-time-is-of-the-essence-part-1/
https://www.psaudio.com/article/cables-time-is-of-the-essence-part-2/
https://www.psaudio.com/article/cables-time-is-of-the-essence-part-3/
So, how do Helix cables prevent that from happening?
In the Helix design, the neutral conductor is wound around the signal conductor, so the neutral is NEVER parallel to the signal wire.
This minimizes -
- induced noise
- Proximity Effect
- Skin Effect
- Rise Time and Decay Distortions
- Minimize Dielectric influences by using only single conductors for the signal and neutral wires
VOILA! - most “cable related problems” are eliminated !!!
(pretty much)
The Helix Geometry is one of the most noise-free cable geometries available.
It should be applied to ALL cables in a system, resulting in a level of fidelity you probably thought could only be attained by having components costing considerably more.
What will you hear? - for me the most noticeable improvement were the venue acoustics, i.e. the echoes and reverberations that surround each artist and instrument.
At first, it can sound as though you have an echo problem in the room, but I have several tracks where there are no reverberations, so playing those confirmed my room acoustics were perfectly fine.
Other attributes that are clearly audible include clarity, neutrality, dynamic performance, bass depth and control.
But one effect that took a while for me to realize just how much it effects the sound is phasing.
Phasing controls the placement of instruments and artists in three ways.
- Their location within the width and depth of the image
- Their location outside of the speakers
- The appearance of the “projection” of sound around (even behind) the listener e.g. like surround sound
We all know if you connect the speakers out of phase the image becomes muddled and the bass performance drops off.
But varying the phase by small amounts can move the position of instruments and artists within the image. The noise impacts the phase of the signals of both channels differently, resulting in an inaccurate image.
Since the Helix Geometry eliminates most all of the noise created inside the actual cable - you will notice an incredibly precise placement of instrument and artist within the image AND an incredibly large image that melts the boundaries of the listening room and envelops the listener.
Now the speakers are truly “invisible”
PLEASE NOTE: Your system will probably not achieve its full potential by installing just one set of helix cables...
They ALL have to have the helix geometry !!!
How To Make Them...
To determine the “Direction” of the Helix - see Inside The Helix Geometry.
Here are the parts...
- Neutral Conductor: 10 gauge silver plated Mil-Spec wire for the neutral from TAKE FIVE AUDIO (TFA)
- Signal conductor: For the budget conscious - a 16 gauge, or 14 gauge or 12 gauge silver plated Mil Spec wire from TFA
- - personally i have not found any difference between these three different gauges, but some people prefer a heavier gauge,
- But - if no expense is to be spared See Note A: The Signal Conductor below
- One five foot 1/2” (12mm) fibreglass rod from home depot
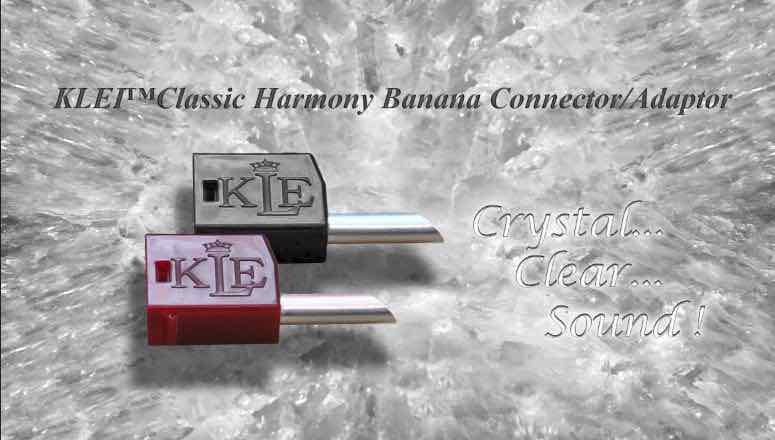
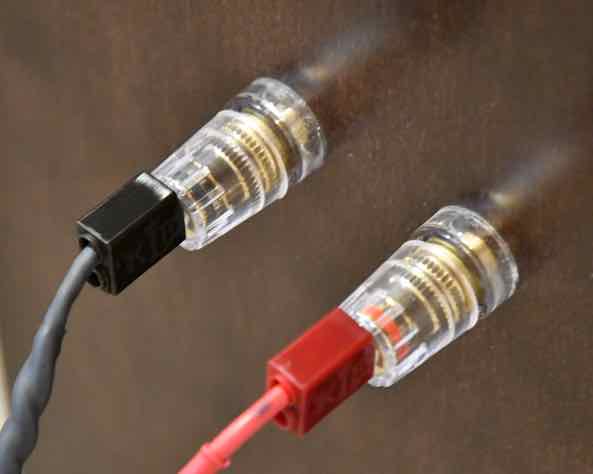
- One set of KLEI™Classic Harmony Banana plugs
- 100 x 10mm wood beads available from Ebay
The neutral conductor should be 2.5 times longer than the signal conductor, although you can experiment with this ratio
So for one 10 ft cable PAIR you need
- 20 ft of signal conductor i.e. 10 x 2
- 50 ft of neutral conductor.
NOTE A: The Signal Conductor
- I have listed the Mil-Spec wire as the signal conductor, but this is more for proof of concept or for the more budget conscious readers - but I have found 12 gauge Duelund copper stranded with Polycast insulation provides more details and better image.
- You can also use the Duelund 12 gauge wire with oil/cotton insulation, which I have heard provides more details
Cut two equal lengths of the neutral conductor - this should be 2.5 times the length of the signal conductor
Put a very tight 90 degree bend in the conductor and tape to the fibreglass rod
Place the end of the fibreglass rod into the chuck of a variable speed drill
Slowly wind the conductor onto the rod
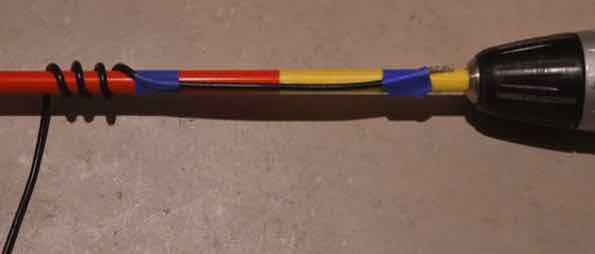
Once the other end of the conductor is reached - leave 6”-8” of straight conductor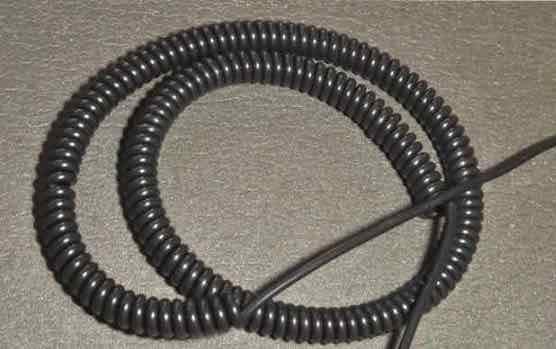
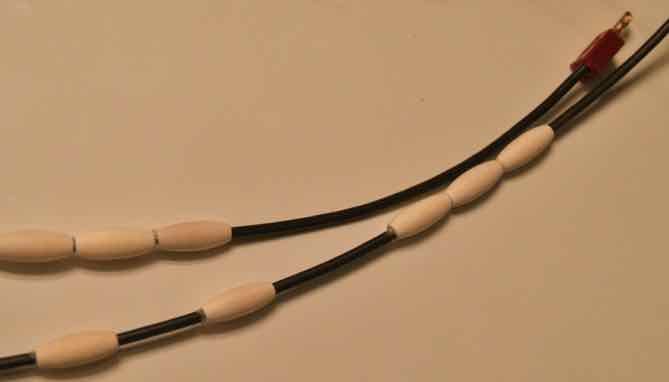
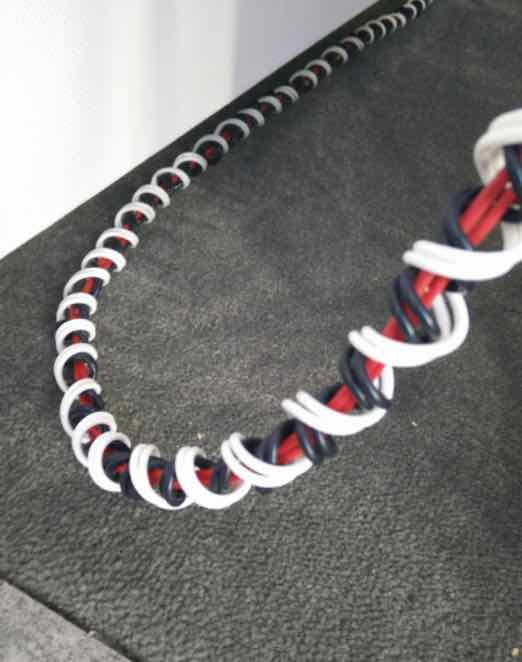
- Slide the beads onto the signal conductor and space them evenly along the entire length leaving an 6-8 inch length of wire for connection to amp/speakers
- I generally leave a gap between the beads equal to the length of one bead
- Where the signal wire comes out of the coil I use three beads together because I have a shelf at that point, which could press the coil onto the signal wire.
- i take this approach at both ends od the cable
- I use a very small dab of glue from a hot glue gun to stop the beads from slipping out of place
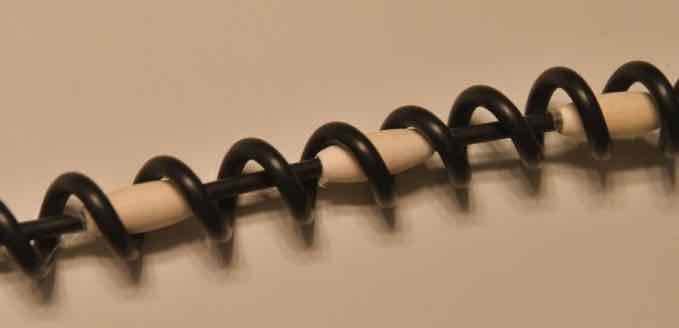
- Insert the signal wire with the beads in the helix coil
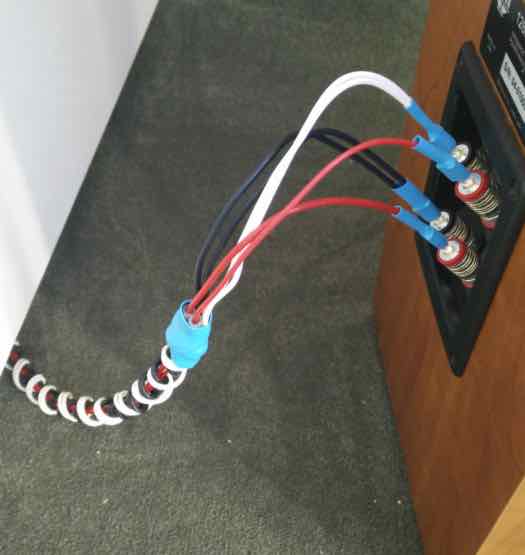
Attach the connectors of your choice - n my case I prefer bananas - Voila!

I highly recommend the KLEI™Classic Harmony Banana Connector/Adaptors because as you will read, they are exceptionally good and elevates the performance of these cables to a whole new level
These cables provide an extremely high resolution listening experience on all systems - i.e. once burned in
They have extremely low levels of capacitance and inductance, so they are perfect for most systems, especially high current solid state designs.
Please allow 100 hours burn in before making any judgement as to their abilities.
Please note: you are free to try whatever conductors you think might work - but the conductors identified above provide exceptional performance and value.
If you are thinking that 16 gauge is too thin to produce an excellent bass performance, I would suggest you try them first.
You will find their characteristics change during burn-in
- they will sound very good at first
- after around 12 hours their performance will degrade - bass will fall off and some distortion will occur
- after 30 hours they really start to shine
- by 100 hours they are exceptional and will continue to get better
They provide exceptionally detailed and a well controlled deep bass performance
The clarity of these cables is superb, as is the dynamics and imaging
Total cost for a 10 ft pair is around $200 US.
I have compared them to cables costing upwards of a couple of thousand dollars and they are superior across the board.
Hard to believe? Well, if I hadn’t heard it for myself I wouldn’t believe it either!
When I built these cables I was actually not expecting much in the way of improvement over my existing cables, which are excellent performers
I thought they might come close to their level of performance - BUT...
I was Blown Away!!!
But REMEMBER: any system will not achieve its full potential by installing just one set of helix cables...
For optimum perofrmance - ALL cables must have the helix geometry !!!
These cables are truly exceptional, from a fidelity perspective and from a cost perspective they are excellent VALUE!.
For Helix cable spec’s please see Its More Than Just Numbers - Isn't It?
I give them my “Best Bang For The Buck” award.
My Review System:
Custom built turntable with a Soundsmith Denon DL103 phono cartridge mounted on an Audiomods Arm with one piece silver litz harness + KLEI Absolute®Harmony RCA’s
Simaudio MOON LP5.3 RS phono stage
Bluesound Node 2 music server
NAIM 5i integrated amp (with passive pre-section).
Gershman Acoustics Sonogram speakers.
 Give them a try - and - Enjoy The Music!
 ![]()
ADDENDUM:
The development of these cables was something of a collaborative effort. it all started when I responded to a post on the Audiogon Cable Forum by Audiogon member Toddverrone (Todd)
Todd was already familiar with the Helix design since had had already made a couple of my Helix power cables.
We discussed possible approaches, but since I had not actually made a set of Speaker Cables I figured I’d better “Walk the Walk”
And so, the Helix Speaker cables (of the above design) were “born”.
However, since Todd’s speakers were configured for a bi-wire/bi-amp approach he wondered if there was a viable Helix Bi-wire solution in a single cable.
Taking the design above, I modified it in the following manner to incorporate two sets of conductors (LF and HF) into a single cable as follows:
- the two positive conductors would be wound around the fibreglass rod and then straightened out by hand, but leaving the kinks in the conductors in place.
- Each conductor is wound in opposite directions in order to stop them from being able to touch continuously to prevent EMI contamination.
- the two signal conductors would be placed inside two (LF and HF) helix neutral windings, but each neutral would also be wound in opposite directions - again to minimize EMI contamination.
- The net result is what Todd referred to as - one “bad-ass” design
- Perhaps I should name it the - Bad-Ass Helix Bi-Wire ?
As part of the process, Todd had first built a prototype along the lines of the original design above, in order to gauge what the single wired cable would sound like.
This level if fidelity could then be used as a benchmark for comparison to the Bi-wired version.
Todd also used a high grade silver plated copper conductor for the bi-wire version
Final conductor details:
Signal Conductor
- One LF 12 awg conductor and One HF 14 awg conductor with a “kinky helix” wind in opposite directions,
- both are silver plated copper in ptfe from take five audio.
- Dual LF 12 awg silver plated copper conductors in ptfe for the inner helix
- Dual HF 14 awg silver plated copper conductors in ptfe for the outer helix
- The 14 gauge was the outer Helix because it is easier to wind
See pictures below...
And The Verdict?
Todd’s Feedback...
- So far, they are superb!
- The same black background as the single helix with cat 5, but more clarity from top to bottom.
- There's not more bass, it's just a bit tighter and cleaner.
- The mids and highs have greater clarity and come further out from the background, with better separation of sounds.
So there you have it! - Seems like Todd is pretty happy with his creation.
Whether single wire or bi-wire these cables provide extremely good fidelity, dynamics and bass performance. But please remember to allow them to burn-in for around 200 hours before serious listening.
A special thanks to Todd for taking on this difficult task - winding those helix neutrals can be quite tiring on the hands
I give them my “DOUBLE Best Bang For The Buck” award.
 Give them a try - and - Enjoy The Music!