


"The HELIX IMAGE" - With a little help from my friends
Last Update: December 2020.
Please see each cable type below for details
This latest development incorporates Neotech Solid UP-OCC Copper wire with Teflon Insulation into all of the Helix Cables
- 12 gauge wire for the Live conductor of the Helix Power Cable
- 14 or 12 gauge wire for the signal conductor of the Helix Speaker Cable
- Two strands of 18 gauge wire for the signal conductor of the Helix Interconnect
The fabrication details and the Neutral wire remains unchanged, which is Silver Plated stranded Copper Mil-Spec wire
I first upgraded the live conductor of a couple of power cables connecting my amp to the mains wall outlet.
The improvements I heard at that time were mainly in the area of improved dynamic performance and more spacious image.
Next was an upgrade to my speaker cables. Based on past versions I decided to use the 14 gauge. in place of the previous 2 x 18 gauge VH Audio wire. Some might prefer the 12 gauge, but I thought this to be too stiff and based on past experiments I had noticed little difference between 12, 14, 16 and 16 gauge wires, with respect to dynamics and bass depth.
Upgrading the Interconnects using the 2 x 18 gauge "Double Shotgun" approach I had employed with the 2 x 18 gauge CH Audio version of the interconnect cables, completed this "trifecta" and highlighted just how good this wire is.
There were improvements to every single metric we use to assess performance -
- Dynamics, Clarity, Details, image size, image focus, space around performers, bass depth and texture
- But there was also a warmth and more body to these cables
- the high frequencies were smoother, cymbals had more texture and vocal sibilance was more "human"
- the mid frequencies had more body and sounded more natural
- the depth of the bass was a little more noticeable and textured.
- But please remember, a single set of cables cannot produce these amazing results.
- in my system ALL of my cables adopt the Helix Geometry and use the Neotech wire!
But were they that much better than the VH Audio or Mundorf wire?
With wires and cables of this caliber you can discern the tinniest improvements or changes.
I now list three wires on this site - Mundorf, VH Audio and Neotech, all of which are capable of achieving extremely good performance on any system.
They are quite different when it comes to the "extremely fine details" and will convey a slightly different sonic presentation.
Also, it could well be that it comes down to personal preference and component synergies.
My preference is for the Neotech wire in all of my cables, but individual preferences on other systems may required that a combination of these wires be used.
So from that perspective I am unable to recommend a specific wire, but in general, for the Interconnect Cables…
- Mundorf 18 gauge Solid Silver with1% Gold is very detailed with a smooth clarity
- VHAudio 18 gauge solid UP-OCC copper with AirLok insulation is perhaps a little warmer, with a little more presence
- Neotech 18 gauge solid UP-OCC copper with Teflon insulation improved performance (slightly) across the board
Burn-in of these cables is critical. Up to the 250 hour mark they can vary in their sound, sometimes harsh and bright and they sometimes presented an unbalanced nature to their image, in that some instruments sounded a little louder and more "forward" than they should i.e. they were not really an integral part of the overall image.
These anomalies are not uncommon during the burn-in process, but you do have to be patient and allow the process to proceed without interruption
See the links below for fabrication details
The previous adaptions to the Helix Interconnect Cables are courtesy of a long time contributor on the Audiogon Forum Member Name: Grannyring (i.e. Bill)
Bill has considerable experience with DIY cables and made me aware of the Schroeder Double Shotgun approach and then went on to build several variations of his Schroeder adaption of the Helix Interconnect that has two wires for the signal wire and two wires for the Neutral Helix coil and reported very favourable results.
Needless to say, I had to try this for myself.
In addition to this, I had also been auditioning in great detail the use of an 18 gauge Solid Copper wire from VH Audio for the Signal conductor, which I now "generally" recommend in place of the Mundorf solid silver + gold wire I had previously favoured.
Both of these adaptions are now detailed on the Helix IMAGE Interconnect link below
And let's not forget the previous contributions courtesy of Ernst of Austria and Yordan & Evgeny of Bulgaria
Yordan and Evgeny have contributed with...
- the performance aspects of various wire types and metallurgy,
- discovered that the direction the helix coil was wound is critical - see Inside The Helix Geometry.
Ernst embraced the Helix design some time ago and has been experimenting with some different materials in order to improve on the performance of the Helix design with astounding success.
His first development was to eliminate the use of as many man-made insulation products (e.g. teflon tubing, expandable Nylon sleeve) used in the original designs.
His second development was to use balsa wood as the spacers every few centimetres in order to hold the signal wire in his speaker cables in the centre of the Helix coil.
The reward for Ernst’s endeavours was a significant improvement is sound quality with respect to improved details, clarity, dynamics, bass control and depth and a significantly wider and deeper image.
His approach considered the Dielectric Constant (D.C.) of various materials.
- Dielectric constant, property of electrical insulating material (a dielectric) equal to the ratio of the capacitance of a capacitor filled with the given material to the capacitance of an identical capacitor in a vacuum without the dielectric material.
Ernst found that using materials having a lower D.C. than that of the insulation, expandable Nylon and heat shrink originally used to centre the signal wire in the Helix, significantly improves on the performance of the cable.
- Since air has a D.C. = 1.1, placing the spacers at intervals on the signal wire improved signal transfer even further.
My “adaptions” of the cables built by Bill, Yordan, Evgeny and Ernst, can be found in the following construction details...
The latest design of the Interconnect Cable...
The new USB Cable...
The latest design of the Speaker Cable...
The latest design of the Power Cable...
I am currently using cables that have been modified as in the links above and can report that the modifications have resulted in significant and easily discernible audible improvements over the older design. Improved clarity, sense of space, dynamic performance and improved details are the benefits observed by the changes in insulation.
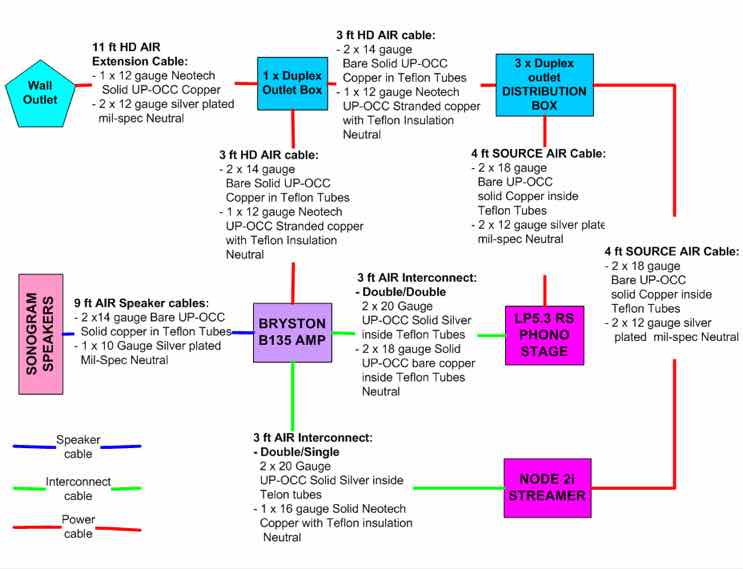
I have listed a few options of wires that can be used for the signal and neutral wires, but the digram below shows which wires I use and for which components
The original helix design concept was to eliminate the parallel conductors commonly used in conventional cable architectures in order to minimizes the noise, proximity effect and Skin effect to imperceivable levels, improving clarity and dynamic performance of the interconnect.
Since those early days, developments include the selection of advanced wire metallurgy, gauge of wire best suited to the task at hand and types of insulation in order to reduce noise to a minimum, which brings us to this moment in time.
The instructions on this web site demonstrates how these cables can be fabricated in the easiest and most cost effective manner in order to achieve extremely high levels of resolution that competes with the very best commercially available products for a fraction of the cost.
Will there be any further updates - probably, because there is always someone, like Bill, Ernst, Jordan and Evgeny that is looking to improve on the capabilities of “The Helix” cable geometry.
“The HELIX IMAGE” - these cables now convey the most realistic and compelling image I have ever observed in any system
The level of detail and clarity, together with precise location of performers and an image that envelopes the listener is stunning
I would like to thank and congratulate Bill, Ernst, Yordan and Evgeny on these exciting new developments.
The stunning performance of Helix Cables of today are due to all that have contributed. including earlier contributors such as Todd (US) for developing the first bi-wire version of the Helix speaker cables, Ghislain (Canada), John (USA) and many others.
WARNING: HELIX Speaker cables WILL NOT work with amps of a fully balanced "Symmetrical" design, such as the the Vitus and some fully balanced designs from Musical Fidelity. they will not harm the amp, they just sound bad
If you have any further questions on these upgrades just drop me a line.
Regards - Steve
Its More Than Just Numbers - Isn't It?
Having said that, the table below is simply a “guide”, since the values depicted are specific to the cables measured.
Minor differences can be expected due to variations in winding the helix, cable length, wire used and sleeving used.
e.g, one person has measured the capacitance of a 0.75 meter interconnect to be around 34 pF
The cables YOU build may not have identical numbers, but they will be fairly close, provided you use similar techniques, parts and wires.
Also - the numbers below are for cables of a specific length. So you will have to estimate the numbers for your cables if their length differs from those below.
Interconnect Cables - 3 ft long - using the 1mm dia Mundorf Solid Silver/Gold wire with the cotton sleeve insulation
- Capacitance = 38 pF
- Inductance = 1.3 uH
Speaker Cables - 10 ft long - using the Duelund 16 gauge tinned copper with cotton/oil insulation
- Capacitance = 95 pF
- Inductance = 3.8 uH
Power Cables - 4 ft long - using the Duelund 12 gauge tinned copper with the Polymer Insulation
- Capacitance = 145 pF
- Inductance = 1.0 uH
So if you cables are different length you could estimate their related values as follows...
e.g. if YOUR speakers cables are 7 ft long then the numbers can be “estimated” as follows...
Capacitance: 95 / 10 x 7 = 66.5 pf
Inductance: 3.2 / 10 x 7 = 2.24 uH
Notes:
Loop Inductance - was measured across the cable at one end, while shorting cable at the other end,
Capacitance was measured across the two conductors with the other end of the cable left “open”
Measurements were taken using an L C meter.
If you really want to get into the science take a look at this link...
http://www.epanorama.net/documents/wiring/cable_impedance.html
So - what do all those numbers (metrics) actually mean?
Rather than delve into complex formulas, I thought that comparing the Helix numbers to other well known commercial brands of cables might be easier for readers to understand, e.g...
- The 95 pF capacitance (roughly 30 pF/Meter) of the Helix Speaker Cable is significantly lower than some cables from Kimber Kable and TOTL Cardas cables which often exceed 300pF/Meter. This is important if connecting to a high current solid state design amplifier.
- The 3.8 uH inductance (roughly 1.3 uH/Meter) of the Helix Speaker Cable is higher than some other brands, but NAIM NAC A5 cable is rated at 1.0 uH/meter (highly recommended by NAIM). I have owned a NAIM amp and the Helix cables worked very well with it and also with some other brands that adopt a high current design philosophy
- One of the few companies that seem to have been able to keep both Capacitance and Inductance to very low levels is Nordost - however, a fellow DIYer’s that tried the Helix promptly sold off their Nordost cables in favour of the Helix - go figure

I consider the Capacitance and Inductance values above to be in the low to medium range when compared to many cables I have looked at from some well established brands
Based on feedback from others who have tried them, they appear be a very good match to a lot of audio components. (see “IMPORTANT:” below) and will minimize many of the issues that conventional cable geometries suffer from.
The Loop Inductance of the Helix Speaker Cable, may be higher than other cables out there, and some people may believe this to be an issue in the upper end of the “generally accepted audio spectrum” of 20Hz and 20kHz.
However, I believe that this does not present any problems, when you consider the frequency range of a person’s “normal” hearing abilities lies between 20Hz and 12kHz over the age of 50.
Of course - if you are a teenager with excellent hearing you may be able to hear as high as 17kHz, (and perhaps a little higher) at which point you may observe a very small decrease in volume in the 15kHz-20Khz range
If you are an engineer in one of the many companies out there that promotes frequency response of their components to be 0Hz to 100kHz - then you may not consider these cables a viable option.
I have posted the Helix numbers above - because I have been asked for them many times, however...
Cable metrics should be used ONLY as a guide!
They ARE NOT a substitute for actually - LISTENING!
IMPORTANT:- electrostatic speakers is an area I have NO experience of, so I would strongly recommend anyone looking at using the Helix Speaker Cables with electrostatic speakers to look at the statistics above and assessing their possible impact before building or connecting Helix Speaker Cables
Inside The Helix Geometry.
I had been sharing my thoughts and designs via emails, with like minded DIYer Yordan and Evgeny of Bulgaria.
In one email, Yordan reported that he and Evgeny had experienced an improvement in sound quality simply by winding the helix in the opposite direction to that initially shown shown on this site, so I decided to investigate.
Putting my photography skills to work I took the following images in an attempt to account for a reason as to why such a noticeable improvement might be experienced, simply by reversing the direction of the Helix winding.
This first image (below) shows the helix being wound in (let’s call it) a clockwise direction.
![image[8]](image005b8005d.jpg)
As you can see, the actual strands of the wire used in the Helix, are crossing the strands in the signal wire at approximately 70 degrees
However - if the helix is wound in the opposite counter clockwise direction (see below), then the angle of the individual strands is much closer to the desired 90 degree angle in order to minimize induced noise even further.
![image[12]](image005b12005d.jpg)
Please Note: that before deciding to wind the Helix in a particular direction, you must take into consideration the direction of the twist of the strands in the actual wire you are using
- in this case, the strands have been twisted in (let’s call it) a clockwise direction
- If the wire had a counter clockwise twist - then the helix should be wound in a Clockwise direction to achieve the 90 degree angle.
This image shows how to wind both the neutral/ground conductors of each and every Helix cable, i.e. provided you are using a wire that has strands twisted in a CLOCKWISE direction as indicated in the images above.

- If the wire used has the strands twisted in the opposite direction, then the Helix should be wound in the opposite direction to that indicated in the above image
This initially included myself, after all, how much of an improvement could this possibly make???
Well, after converting all of my own cables to the counter clockwise twist I was completely surprised to find that the changes were very discernible and contributed to a much improved image and very much improved clarity.
How Anal Do You Wanna Get?
In the images above, I have used the same wire for both live/signal and neutral conductors and as such the twist of the individual strands in both wires is the same. But what if the strands in just ONE wire is twisted in the opposite direction, which direction should the helix be wound in ???
That decision I will leave to the individual.
Personally - I think this level of “detail” is beyond the resolution capabilities of my system, but I felt it should at least be mentioned for those out there that may wish to investigate
Other Observations from Yordan include...
Having had many email conversations with Yordan, he has shared the following observations he experienced, which include:
- The cables sound more open when the expandable nylon sleeve i.e. to give the cable a “professional appearance”, is NOT used
- The power cables sounded better without spades
- Personally, on my system I found the spades provided faster dynamics and bass delivery
- avoid using heat shrink tubing where it draws the signal and neutral wires closer together
- To better isolate the signal (or live) wire use teflon tube - not the expandable sleeve as identified in the web site
NOTE: I have tried a couple of things above, but on my system I did not experience the same observations. But as in Yordan’s case, on your system you could observe improvements by following his tips. so give them a try
So, the Proof of the Pudding...
So, to put Yordan’s “Helix direction” findings to the test, I rebuilt built all of my Helix cables, this time with the Helix neutral wound in a counter clockwise direction. with everything else being identical.
Right from the very first track it was apparent that the direction of the helix REALLY DOES MATTER!
The image was larger in all dimensions, with the location of musicians being more precise and with more space around them, details and associated clarity improved, dynamic performance was faster, bass performance was faster with more texture and the mid and upper frequencies revealed a new warmth not previously there.
But Was It Easily Discern-able?
To these old ears - very definitely. I spent over two hours playing the tracks I use to audition cables and components, just so I could hear how much better they sounded with the revised Helix cables.
So there you have it - taking into account the actual direction of the Helix winding has proven beneficial
What if I have already used a Clockwise Helix???
If you would like to correct a cable that has a Clockwise wound helix...
- DO NOT simply pull the Helix coil straight - this will over-twist the strands inside the wire
- Remove the Helix coil from the cable i.e. slide the coil off of the live/signal conductor intact
- Then slide the helix coil onto a suitably sized steel/fibreglass rod - NOTE: you will probably need to compress the coil
- Finally, pull on one end of the coil, allowing the coil to spin around on the rod
- this technique prevents the twisted strands inside the wire from becoming deformed
- You can then rewind the helix in the correct direction without any issues
- The important thing is that you “UNWIND” the helix coil
- Otherwise: it may deform the strands inside the wire, which will impact performance
- NOTE: - power cables are not as sensitive as Speaker cables and interconnects and changing the direction of the Helix does not offer any real discernible improvements in sound quality, so changing their helix direction is not necessary
I have performed this procedure several times and can report that it is actually very easy and a much more effective method than trying to simply straighten a helix coil.
Is all this really necessary?
Well, the choice is yours. The Helix cables will sound extremely good no matter what direction the Helix coil is wound in!
But the improvements achieved on all of my cables by winding the helix in the correct (counter clockwise) direction is the icing on the cake.
Regards - Steve